Developer Guide
Table of Contents
- Introduction
1.1. Background
1.2. Purpose
1.3. Scope - Getting Started
2.1. Prerequisites
2.2. Setting Up
2.3. Running the Program - Design
3.1. Architecture
3.2. UI Component
3.3. Logic Component
3.4. Model Component
3.5. Storage Component - Implementation
4.1. Project
4.1.1. Create Project
4.1.2. List Project
4.1.3. Select Project
4.1.4. View Project
4.2. Task
4.2.1. Add Task
4.2.2. View Task
4.2.3. Delete Task
4.2.4. Change Task Priority
4.2.5. Mark Task as Complete
4.2.6. View Task by Descending Priority
4.3. Sprint
4.3.1. Create Sprint
4.3.2. View Sprint
4.3.3. Add Task to Sprint
4.3.4. Remove Task from Sprint
4.3.5. Allocate Sprint Tasks to Members
4.4. Storage
4.4.1. Location
4.4.2. Loading Data
4.4.2.1. Converting and Mapping of JSON to Objects
4.4.3. Saving Data
4.4.3.1. When the Program Exits
4.4.3.2. Changes Made to the Data
4.4.3.3. Serialising Objects to JSON - Appendix: Requirements
5.1. Target User Profile
5.2. Value Proposition
5.3. User Stories
5.4. Non-Functional Requirements
5.5. Glossary - Appendix: Instructions for manual testing
1. Introduction
1.1. Background
SCRUMptious is a Java-based command line interface application for you to efficiently manage the development of a project. Leveraging the robust SCRUM/Agile framework, it allows you to delegate tasks to your team members and organize project requirements with ease. As a bonus, if you are a keyboard warrior, you can reach peak efficiency using SCRUMptious to manage your projects.
1.2. Purpose
This guide illustrates the general architecture, and software design of SCRUMptious.
1.3. Scope
This guide is geared towards developers who wish to enhance or create their own version of SCRUMptious. As such, it contains important information regarding the software architecture and design considerations of SCRUMptious.
2. Getting Started
2.1. Prerequisites
- JDK 11.
- IntelliJ IDEA.
2.2. Setting Up
- Use a Git tool to fork this repository, or download the .zip file from GitHub and extract the contents into a new folder.
- Right-Click on the folder and select “Open folder as Intellij IDEA Community Edition Project”.
- Ensure JDK 11 is selected for Gradle, by navigating to Configure > Structure for New Projects > Project Settings > Project > Project SDK.
2.3. Running the Program
This program can be run once it is compiled. If you have built its artifacts (.jar) file, you may run it using java -jar <filename.jar> on your command line.
3. Design
This section seeks to explain the high-level design of the application. Given below is a quick overview of each component and the explanation of the design architecture in greater detail. SCRUMptious is the main class of the application, and handles the initializing and execution of the appropriate classes.
3.1. Architecture

Figure 3.1: Architecture Diagram
The Architecture Diagram shown above describes the high level association operations of the application. A quick overview of the components is as follows:
Main is single-class component of SCRUMptious. It is responsible for:
- At app launch: Initializes the components in the correct sequence(Storage, UI, Parser), and links them together where appropriate.
- At program exit: Invokes Storage component to save all unsaved data.
The other packages are described below:
UI: The user interface of the app, reads user input and is visible to the user.Parser Manager: The module that reads user inputs, and creates a suitable parser based on the command to make sense of user input. Respective parser then tells the Command module what to execute.ProjectManager: Manages and stores all the projects added by the user, keeps track of selected project.SprintManager: Stores all sprints associated with a project.TaskManager: Stores all tasks in backlog associated with a project.ProjectMembers: Stores all team-members associated to a project.Parser: Creates a suitable parser, based on the command to make sense of the user input. Respective parser then make use the information and call respective commands.
Each of the modules listed above are a collection of constituent classes, with each handling specialized tasks in-line with the SLAP principle.
3.2. UI Component

Figure 3.2: Simplified class diagram for UI Component
The UI component contains the Ui and a few subclasses to print different types of messages.
The Ui consist of:
1. printWelcomeScreen()
2. getUserCommand()
3. showToUser()
4. showToUserLn()
5. showError()
The subclasses are called directly by other functions. For example, if TaskCommand wants to show an
error message, it will call Ui.showError(<error message>) directly.
3.3. Logic Component
The Logic component contains the ParserManager and its subclasses, and the Command class and its subclasses, which mainly handles the commands input by the user.
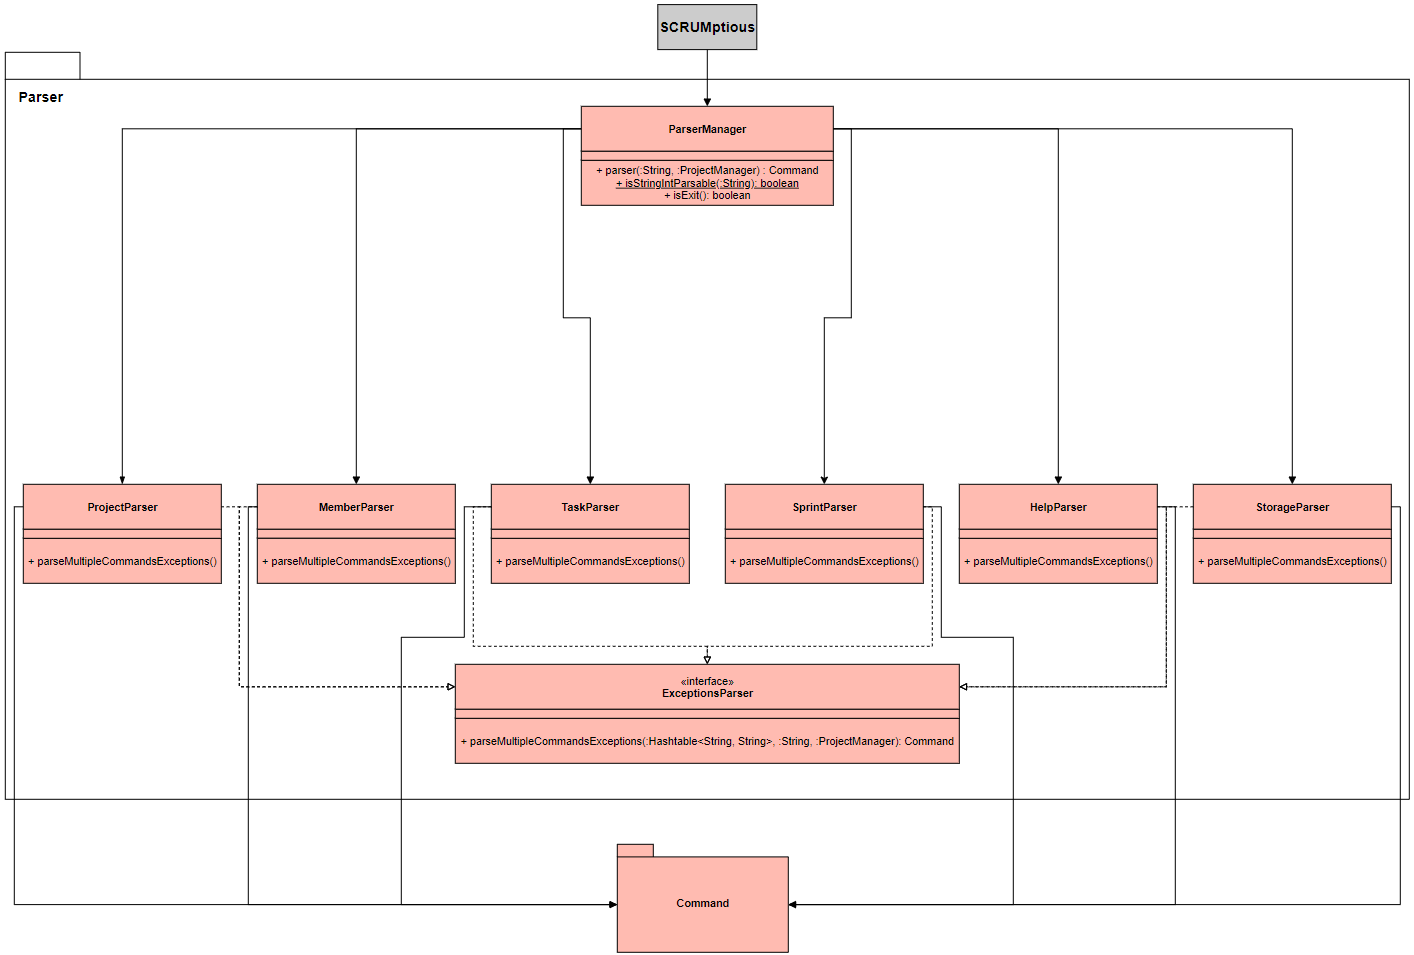
Figure 3.3.1: Simplified class diagram for Logic Component
When a user types a command, SCRUMptious calls the ParserManager. The ParserManager then parses commands from the user. Subsequently,
the ParserManager passes the commands on to the respective exceptions parsers which inherit from the ExceptionsParser interface.
The exceptions parsers consist of:
1. ProjectParser
2. MemberParser
3. TaskParser
4. SprintParser
5. HelpParser
6. StorageParser
-
The
ProjectParservalidates the parameters of the command. If the command is valid, it returns the respectiveXYZProjectCommandto theParserManager. If the command is invalid, theProjectParserreturns an appropriate warning message to the user. -
The
MemberParservalidates the parameters of the command. If the command is valid, it returns the respectiveXYZMemberCommandto theParserManager. If the command is invalid, theTaskParserreturns an appropriate warning message to the user. -
The
TaskParservalidates the parameters of the command. If the command is valid, it returns the respectiveXYZTaskCommandto theParserManager. If the command is invalid, theTaskParserreturns an appropriate warning message to the user. -
The
SprintParservalidates the parameters of the command. If the command is valid, it returns the respectiveXYZSprintCommandto theParserManager. If the command is invalid, theSprintParserreturns an appropriate warning message to the user. -
The
HelpParservalidates the parameters of the command. If the command is valid, it returns the respectiveXYZHelpCommandto theParserManager. If the command is invalid, theHelpParserreturns an appropriate warning message to the user. -
The
StorageParservalidates the parameters of the command. If the command is valid, it returns the respectiveClearStorageCommandto theParserManager. If the command is invalid, theStorageParserreturns an appropriate warning message to the user.
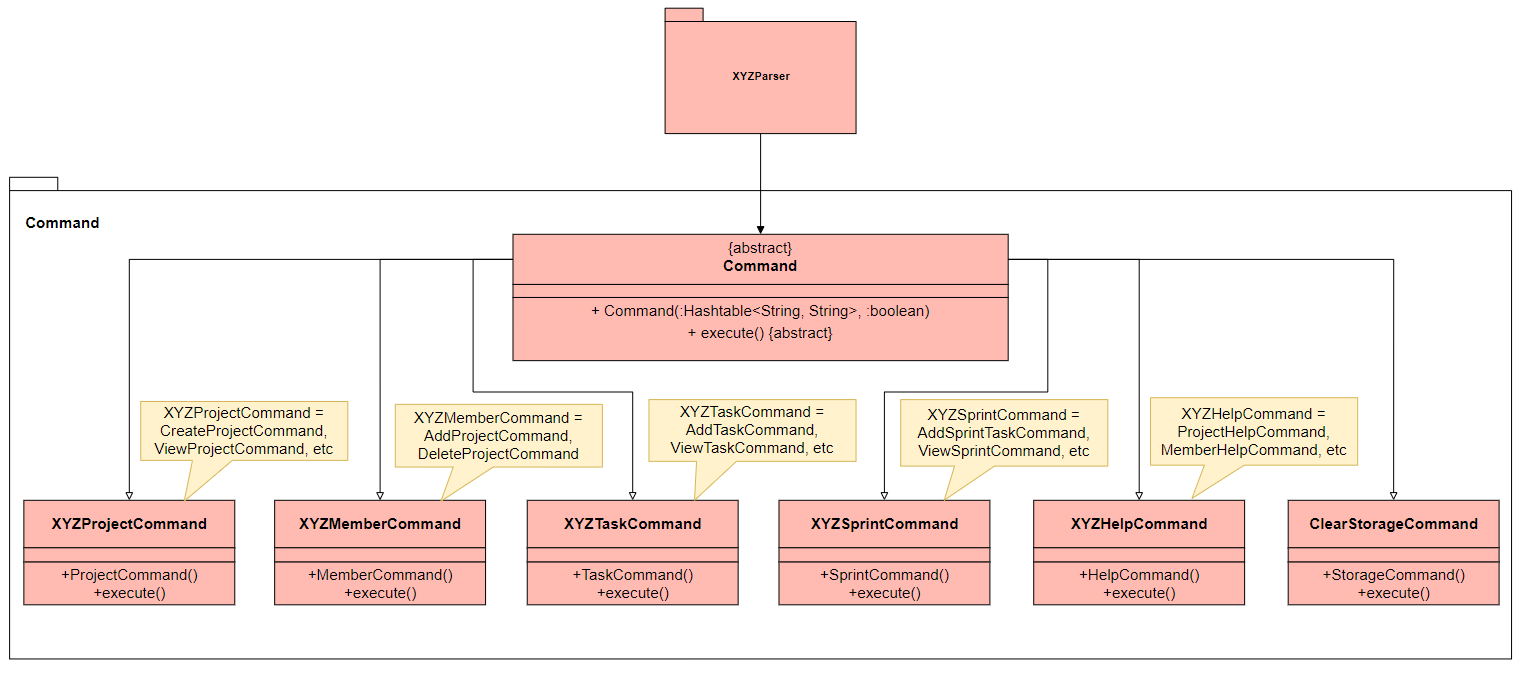
Figure 3.3.2: Simplified class diagram for Logic Component
The subcommand classes XYZHelpCommand, XYZProjectCommand, XYZMemberCommand, XYZTaskCommand, XYZSprintCommand, ClearStorageCommand all inherit from an abstract Command class,
which has an execute function and its respective constructors.
The ParserManager then returns the command back to SCRUMptious, which then executes the command.
3.4. Model Component

Figure 3.4: Simplified class diagram for Model Component
The Model package defines all the object classes that are used by SCRUMptious and this section will explain how these objects interact with other components and each other.
Initialisation
- Upon starting the program, SCRUMptious will initialise one instance of
ProjectManagerwhich will be used to facilitate all the operation in the program.
Operation - Command Execution
When a Command from the Logic component is executed, it will work on the same ProjectManager initialised previously and will branch down to the necessary packages as required.
Project Operations
ProjectManagerfacilitate the management of multipleProjectinstances.- Creation of
Projectadds an entry toProjectManager. - Deletion of
Projectremoves an entry fromProjectManager.
- Creation of
Projectcontain necessary information about the project such as:- Project ID
- Project Title
- Project Description
- Project Duration
- Sprint Length
- Project Start Date
- Project End Date
Projecthold three additional object that are initialise upon its creation:ProjectMembersto facilitate the management ofMembersthat are working on theProject.SprintManagerto facilitate the management ofSprintiterations that belongs to theProject.TaskManagerto facilitate the management ofTasksthat are broken down from theProject.
Members Operations
ProjectMembersfacilitate the management of multipleMembersinstances and is dependent on theProjectthat initialises it.- Creation of
Memberadds an entry toProjectMembers. - Deletion of
Memberremoves an entry fromProjectMembers.
- Creation of
Membercontain the Member's user ID.
Task Operations
TaskManagerfacilitate the management of multipleTaskinstances and is dependent on theProjectthat initialises it.- Creation of
Taskadds an entry toTaskManager. - Deletion of
Taskremoves an entry fromTaskManager.
- Creation of
Taskcontain necessary information about the task such as:- Task ID
- Task Title
- Task Description
- Task Priority
- Task Completion Status
Taskcontain two additional ArrayList that are initialise upon its creation:- ArrayList of Member's user ID to keep track
Memberswho are assigned to work on the task. - ArrayList of Sprint ID to keep track
Sprintsthat the task are allocated to.
- ArrayList of Member's user ID to keep track
Sprint Operations
SprintManagerwill facilitate the management of multipleSprintinstances and is dependant on theProjectthat initialises it.- Creation of
Sprintadds an entry toSprintManager.
- Creation of
Sprintcontain necessary information about the iteration such as:- Sprint ID
- Sprint Goal
- Sprint Start Date
- Sprint End Date
Sprintcontain one additional ArrayList that are initialise upon its creation:- ArrayList of Task IDs to keep track
Tasksthat are allocated to theSprint.
- ArrayList of Task IDs to keep track
3.5. Storage Component

Figure 3.5: Simplified class diagram for Storage Component, Model and json.simple
API: StorageManager.java
The Storage component is using the JavaScript Object Notation (JSON) to save the data. The library used for serialising and deserializing the data is json.simple 3.1.1 by Clifton Labs.
As shown in the diagram above, JsonableObject and JsonableArray are interfaces which inherits the Jsonable interface. The following model class inherits only one of the two interfaces:
- ProjectManager
- Project
- SprintManager
- TaskManager
- ProjectMembers
- Sprint
- Task
- Member
This requires the model classes to implement two methods required for JSON serialisation and deserialisation:
toJson(): Contains logic required to convert the model object into JSON string.fromJson(): Contains logic required to convert JSON object into its respective model class.
4. Implementation
4.1. Project

Figure 4.1: Project Class Diagram
4.1.1. Create Project

Figure 4.1.1: Sequence diagram of CreateProjectCommand
Link: CreateProjectCommand.java
A project is created with a clear title and description of what the team is working on
for delivery, as well as the project length and the sprint duration specified. ProjectManager stores all the projects
in a hash table with projectID, project as key,value pair.
Before execution:
-
Parse user input
project /create -title <title> -desc <description> -dur <duration> -sd <sprint interval>into CommandSCRUMptious will receive user input using the
Uiclass and parse it intoCreateProjectCommandwithParserandProjectParser. -
Execute CreateProjectCommand
SCRUMptious calls
Command.execute()which will execute the command as mentioned in the implementation.
Implementation:
-
Prepare parameters
- Extracts required fields, to be passed as parameters for project creation.
-
projectManager.addProject()adds a project using the parameters provided. -
Output to User
printCreatedProject()is then called to output the newly created Project inaddProj.toStringviaUi .showToUserLn()
4.1.2. List Project
All the projects added by the user are shown as an output. Before execution:
-
Parse user input
project /listinto CommandSCRUMptious will receive user input using the
Uiclass and parse it intoListProjectCommandwithParserandProjectParser. -
Execute ListProjectCommand
SCRUMptious calls
Command.execute()which will execute the command as mentioned in the implementation.
Implementation:
-
The program iterates through
projectManager.getProjectList()to get a list of all the projects stored inProjectManager. -
Output to User
proj.getTitle()andproj.getDescription()is then called to output all the projects inProjectManagerviaUi.showToUserLn().
4.1.3. Select Project
Select the project on which all the commands are executed.
Before execution:
-
Parse user input
project /select <id>into CommandSCRUMptious will receive user input using the
Uiclass and parse it intoSelectProjectCommandwithParserandProjectParser. -
Execute SelectProjectCommand
SCRUMptious calls
Command.execute()which will execute the command as mentioned in the implementation. The required project will then be chosen as reference and stored inProjectManager.
Implementation:
-
The input
idis used to access the corresponding project stored in a hashtable in theprojectManager. -
Output to User
parameters.get('0')is used to get the selected id and generate output viaUi.showToUserLn().
4.1.4. View Project
View the details of the project on which the user is currently working on. Before execution:
-
Parse user input
project /viewinto CommandSCRUMptious will receive user input using the
Uiclass and parse it intoViewProjectCommandwithParserandProjectParser. -
Execute ViewProjectCommand
SCRUMptious calls
Command.execute()which will execute the command as mentioned in the implementation.
Implementation:
-
The selected project is accessed by using
projectManager.getSelectedProject(). -
Output to User
The project is shown to the user by
proj.toString()viaUi.showToUserLn()
4.2. Task
4.2.1. Add Task
A task is created following the creation of a project, with a clear title, description
and priority of the task. TaskManager stores all the tasks in an array list.
Prerequisites:
- There must be at least one project.
Before execution:
-
Parse user input
task /add -title <title> -desc <description> -priority <priority>into CommandSCRUMptious will receive user input using the
Uiclass and parse it into CreateTaskCommand usingParserandTaskParser. -
Check whether a project exists. If there are no projects, an error is displayed and no tasks are created.
-
Execute AddTaskCommand
SCRUMptious calls
Command.execute()which will execute the command.
Implementation:
-
Prepare parameters
- Extracts required fields, to be passed as parameters for task creation.
- Checks the title for duplicates. If duplicate found, an error is displayed and the task is not created.
-
taskManager.addTask()adds a task using the provided parameters. -
User output The overridden function
toString()is called to output the new Task using Ui.showToUserLn().
4.2.2. View Task

Figure 4.2.2: Sequence diagram of ViewTaskCommand
The user specifies one or more task IDs to view the corresponding tasks.
Prerequisites:
- There must be at least one project.
Before execution:
-
Parse user input
task /view <taskid> [<taskid>...]into CommandSCRUMptious will receive user input using the
Uiclass and parse it into ViewTaskCommand usingParserandTaskParser. -
Check whether a project exists. If there are no projects, an error is displayed.
-
Execute ViewTaskCommand
SCRUMptious calls
Command.execute()which will execute the command.
Implementation:
-
Prepare parameters
- Extracts the task IDs, to be passed as integers for task viewing.
- Checks IDs for invalid IDs. Any entry of invalid IDs will show corresponding errors.
-
Obtain task list
- The task list is obtained from the project.
-
User output The overridden function
toString()is called to output the requested Tasks in the task list using Ui.showToUserLn().
4.2.3. Delete Task
Users may choose to delete tasks that are deemed unnecessary or incorrect. The task IDs are provided.
Prerequisites:
- There must be at least one project.
- There must be at least one task for the command to delete.
Implementation:
- UI receives user input
- Parser parse user input
- Execute DeleteTaskCommand
- Check all IDs are valid. Invalid IDs will display corresponding errors.
- On TaskList
- Delete the task from the task list
- On sprints
- De-link the task from all sprints.
- UI output to user
4.2.4. Change Task Priority
A user can change the priority of an existing task after changes to project requirements. The task ID and new priority are provided.
Prerequisites:
- There must be at least one project.
- There must be at least one task for the command to edit its priority.
Implementation:
- UI receives user input
- Parser parse user input
- Execute ChangeTaskPriorityCommand
- Check the new priority is valid. If not valid, an error will be displayed.
- Check all IDs are valid. Invalid IDs will display corresponding errors.
- The corresponding task will be updated its priority
- UI output to user
4.2.5. Mark Task as Complete
The user can mark tasks as complete when the team completes the task. The task IDs are provided.
Prerequisites:
- There must be at least one project.
- There must be at least one task for the command to be marked complete.
Implementation:
- UI receives user input
- Parser parse user input
- Execute DoneTaskCommand
- Check all IDs are valid. Invalid IDs will display corresponding errors.
- The corresponding tasks will be marked as complete.
- UI output to user
4.2.6. View Task by Descending Priority
A user may choose to view all tasks in order of priority associated with the project. No parameters are supplied.
Prerequisites:
- There must be at least one project.
Implementation:
- UI receives user input
- Parser parse user input
- Execute PriorityViewCommand
- UI output to user
4.3. Sprint
In SCRUMptious, a Project will be broken down into smaller iterations known as Sprints. The Sprint will contain information about the Tasks allocated for that iteration and Members that are assigned to complete the Tasks.
The following section will explain how the management of Sprints is implemented in the program.
4.3.1. Create Sprint

Figure 4.3.1: Sequence diagram of CreateSprintCommand
Link: CreateSprintCommand.java
A Sprint can be created when there is an existing Project. When the Project is created, the duration of the Project and length of the Sprints are specified, thus, there will be a finite number of Sprints for each Project.
Usage scenario:
-
Parse user input into Command
SCRUMptious will receive user input using the
Uiclass and parse it intoCreateSprintCommandwithParserandSprintParser. -
Execute CreateSprintCommand
SCRUMptious calls
Command.execute()which will execute the command as mentioned in the implementation. -
Choose the Project to add the new Sprint
chooseProject()will be called to check for the optional-projecttag in the user specified parameters.Note: If the tag is not specified, the default Project in the ProjectManager indexed by
selectedProjectwill be chosen. -
Prepare parameters
prepareParameters()will be called to check for the mandatory-goaltag in the user specified parameters. In addition, It will also prepare the optional-starttag as required in the following two scenarios:-
New Sprint is first Sprint in Project
Being the first Sprint in the Project, the
-starttag will determine the start date for both the new Sprint and Project. Thus, theStringparameter will be sent to DateTimeParser viaparseDate()to parse it into a LocalDate object.The end date for the Project and Sprint will also be determined by adding
projectDurationandsprintLengthto the start date respectively. -
New Sprint is not first Sprint in Project
As there is a previous Sprint before the newly created Sprint, the new Sprint will start the day after the previous Sprint ends. Thus, the
-starttag will be ignored even if specified by user.
-
-
Check all sprint created
With all the necessary parameters prepared, the command will check if there is still room to add new Sprint by checking if the prepared
sprintEndDateis after theprojectEndDate.Note: This check is done after the
prepareParameters()as the LocalDatesprintEndDateis required. -
Update Project Start and End date if new Sprint is first Sprint
As mentioned above, if the new Sprint is the first Sprint in the Project, the
-starttag will determine the start and end date of the Project. -
Add Sprint to Sprint Manger
addSprint()is finally called to add a new Sprint to the Sprint Manager. -
Output to User
printCreatedSprint()is then called to output the newly created Sprint increatedSprint.toString()viaUi .showToUserLn()
4.3.2. View Sprint
Link: ViewSprintCommand.java
A Sprint can only be viewed when there is an existing Sprint. When the user request to view the sprint, the Sprint number is specified and the program will output the information about the Sprint corresponding to the Sprint number.
Prerequisites:
- At least one Sprint in the SprintList
Implementation:
- UI receive user input
- Parser parse user input
- Execute ViewSprintCommand
- Get Sprint from SprintList
- UI output to user
4.3.3. Add Task to Sprint
Link: AddSprintTaskCommand.java
Users can add Tasks existing in the Project Backlog to the Sprint, indicating that the Tasks are to be worked on during the iteration.
Prerequisites:
- At least one Sprint in the SprintList
- At least one Task in the ProjectBacklog
Implementation:
- UI receive user input
- Parser parse user input
- Execute AddSprintTaskCommand
- On Sprint
- Add Task ID into sprintTaskIds
- On Task
- Add Sprint Number into sprintAllocatedTo
- UI output to user
- On Sprint
4.3.4. Remove Task from Sprint
Link: RemoveSprintTaskCommand.java
Users can remove Tasks from Sprint, indicating that the Tasks are deemed to not be worked on during the iteration.
Prerequisites:
- At least one Sprint in the SprintList
- At least one Task is added to the selected Sprint
Implementation:
- UI receive user input
- Parser parse user input
- Execute RemoveSprintTaskCommand
- On Sprint
- Remove Task ID from sprintTaskIds
- On Task
- Remove Sprint Number from sprintAllocatedTo
- UI output to user
- On Sprint
4.3.5. Allocate Sprint Tasks to Members
Link: AllocateSprintTaskCommand.java
Users can allocate Sprint Tasks to Members, indicating that the Tasks are assigned to the selected member to work on during the iteration.
Prerequisites:
- At least one Task is added to the selected Sprint
- At least one Member is added to the Project
Implementation:
- UI receive user input
- Parser parse user input
- Execute AllocateSprintTaskCommand
- On Task
- Add Member ID into membersAllocatedTo
- On Member
- Add Task ID into allocatedTaskIds
- On Task
4.4. Storage
To make the data persistent and portable, JSON has been chosen as the format for data to be saved to a persistent storage such as storage drives, thumb drives and any other storage medium which stores the program. JSON is also human-readable which allows users to directly modify the data file easily. This can be useful in certain scenarios such as fixing the data file in the event of data corruption.
4.4.1. Location

Figure 4.4.1: Running the Jar or in IDE
As shown in the above diagram, the program will save the data as "data.json". The data file is saved in the “data/” folder that is located in the folder of the program. If you are testing the program using Intellij IDE, the “data/” folder will be in the root of the project folder.
When you start the program, the program will load the data file from its respective location and deserialise it into its respective objects. Data will be saved when the program exits or whenever the user makes changes to the data.
4.4.2. Loading Data

Figure 4.4.2: Loading Data
The program will only load the data file in the persistent storage during the initialisation process of the program. With reference to the sequence diagram above, the flow of the logic is as follows:
- When the user starts the program, it will first call
init()to initialise the program. - A
StorageManagerobject will be instantiated with the reference to aProjectManagerobject that is used during load and save operations. load()will read the data file from the persistent storage, deserialise it into aJsonObjectobject and attempt to convert the object into its respective types.
Failure to Load
If the program fails to load the data file, it will proceed in an empty state. Any subsequent saves invoked by any command that changes the empty state, or exiting the program using bye will cause the erroneous data file (if any) to be deleted.
The program will fail to load the data file if any of the following conditions are met:
- I/O error trying to read the file.
- Error parsing due to incorrect JSON format.
- Conversion error due to missing properties.
- Mapping error due to invalid property type (e.g. "name" is expecting a
Stringbut data read is anInteger).
4.4.2.1. Converting and Mapping of JSON to Objects

Figure 4.4.2.1: Parsing Sequence
Due to the limitations of the library, parsing of the JSON string only converts it into either JsonObject or JsonArray objects which requires additional operations to map the data back to the respective model classes.
As explained in Storage Component, each model class except for Priority will inherit either JsonableObject or JsonableArray which are custom interfaces inheriting the Jsonable interface of json.simple. This requires the classes to implement the methods toJson() and fromJson(). This section will focus on fromJson(), which is used to implement the logic for converting and mapping of JSON to objects of their respective type.
- After loading the raw JSON string,
StorageManagerwill callJsoner.deserialize()to convert it into an object ofJsonObject. - At this point,
JsonObjectcontains all the properties ofProjectManagerand needs to be mapped back to aProjectManagerobject. StorageManagerwill callProjectManager.fromJson(), passing theJSONObjectobject from Step 2 as the parameter.- In
fromJson(), there are two type of actions depending on the property it is mapping:- Type Casting: Properties that are primitive or standard can be mapped directly through type casting (e.g.
int,boolean,Stringetc.) - *Calling
fromJson()of the Actual Type: Any property that is originally a type of the Scrumptious model classes will be mapped with the following steps:- Create an empty object of the respective type (e.g.
Sprint). - Type cast the property as
JsonObjectorJsonArraydepending on the actual type of the property (e.g.(JsonArray) object). - Call
fromJson()of the newly created object, passing the property as the parameter (e.g.Sprint.fromJson()). - New object's
fromJson()will repeat the same process again under Step 4 for its own properties.
- Create an empty object of the respective type (e.g.
- Type Casting: Properties that are primitive or standard can be mapped directly through type casting (e.g.
*Priority is an enum and is the only model which does not follow this strictly. It is mapped by type casting
the property as String first, then calling the Priority.valueOf() method to convert it into its respective enum.
4.4.3. Saving Data
Data will be saved under two scenarios:
- When the program exits.
- Changes made to the data.
4.4.3.1. When the Program Exits

Figure 4.4.3.1: Saving Data When Program Exits
Scrumptious will call destroy() which calls save() before it returns.
4.4.3.2. Changes Made to the Data
Changes made to the data during the runtime of the program can only be made by executing a command.

Figure 4.4.3.2: Saving Data When Changes Made
As shown in the diagram above, each command class inherits the shouldSave property from Command class. shouldSave is a boolean variable and is initialised inside the constructor. shouldSave will be set to true if the command results in a change of data (e.g. adding a task, creating a sprint etc.), otherwise it is set to false (e.g. viewing projects, sprints etc.).
After executing the command by calling execute(), the program will call save() from StorageManager object if the shouldSave property is set to true.
4.4.3.3. Serialising Objects to JSON

Figure 4.4.3.3: Serialising Sequence
As explained in Storage Component, each model class except for Priority will inherit either JsonableObject or JsonableArray which are custom interfaces inheriting the Jsonable interface of json.simple. This requires the classes to implement the methods toJson() and fromJson(). This section will focus on toJson(), which is used to implement the logic for serialising objects into JSON string.
When saving the data as JSON file, StorageManager will call Jsoner.serialize() of the json.simple, passing in the ProjectManager and FileWriter (points to the data file) object as the parameters. The library will automatically serialise the objects and sub-objects into JSON string depending on the type of the objects:
- Primitive and Standard Types (e.g.
int,String,Collection): The library can directly serialise these types into JSON string. - *Scrumptious Model Types (e.g.
Project,Task): The library will serialise these types by calling itstoJson()method which contains the logic for the serialisation.
*Priority is an exception, it is serialised by calling name() of the enum which will return its String representation.
5. Appendix: Requirements
5.1. Target User Profile
SCRUMptious is a command-line software targeted to project managers, team leaders and enterprises using the SCRUM methodology (agile) for product and project development. It is primarily catered to users who wish to develop a product in team using an organized framework.
5.2. Value Proposition
SCRUMptious solves the problem faced by teams during development. It helps teams to keep up with rapid change and innovations that come in the course of development, mainly due to change in requirements by the customer. It is suitable for teams with clear focus, and limits distractions whilst promoting teamwork and collaboration.
5.3. User Stories
| Version | As a ... | I want to ... | So that I can ... |
|---|---|---|---|
| v1.0 | Project Manager | Specify the goal for new sprint | Be clear about the main objective to be achieved. |
| v1.0 | Project Manager | Want to pre plan future sprints | Have a clear structure regarding project progress. |
| v1.0 | New user | Have access to a help menu | Learn to use the program easily |
| v1.0 | Project Manager | Want to add and remove tasks from future sprints | Pre-plan the development phase |
| v1.0 | Project Manager | Be able to manage many projects simultaneously | Work on different projects at the same time |
| v1.0 | Student/User | Be able to create a new project and give it a name | Identify the project I am working on |
| v2.0 | User/Manager | Clear data stored from previous sessions. | Start fresh when previous projects have finished |
| v2.0 | User/Team Lead | Be able to add and delete members associated with a project | Effectively keep track of everyone working on a project |
| v2.0 | Team Lead | Be able to assign tasks to team members | Keep track of who is working on which feature |
| v2.0 | Team member | Add tasks with specific priority | Understand what features/tasks are of greater urgency |
| v2.0 | Team member | Change the priority of added task | Update the task urgency depending on the feedback achieved after every sprint |
5.4. Non-Functional Requirements
- Should work on any OS as long as it has Java 11 installed.
- The average user is someone who manages teams in development phases, and takes responsibility of delivering the product (eg: Team leader in University projects, Project Manager in enterprises etc).
- The user prefers typing instructions and commands rather than using a GUI for management purposes.
5.5. Glossary
The terms listed in this glossary are in alphabetical order.
- GUI - Graphical User Interface
- I/O - Input/Output is the communication between the computer and the user through GUI or terminal.
6. Appendix: Instructions for manual testing
- Download the jar file and copy it into an empty folder.
- Open a new terminal window and navigate to the same directory where the SCRUMptious.jar is located.
- Enter the command
java -jar SCRUMptious.jarinto the terminal window to launch the application. The application should now be running.